Macro Photography
First of all I would like to thank everybody who reads my posts and enjoys my photos, I really appreciate that you take some time out for that!
This time I would like to post about macro photography or close ups. This is more for those of you who don't have specific macro lens like myself, but try it by using the settings of the camera. If you are serious about macro photography then it is of course advisable to buy a proper macro lens as this will give you the best results. I enjoy some macro photography occasionally and it's more to be able to take some nice close ups of flowers/plants in the spring/summer time. So, this part will be for those of you who like to be able to take some nice macro shots while out and about in gardens, parks and such.
The best macro photography, regardless of the camera, requires that you use the smallest lens aperture to gain optimum image sharpness and depth of field. A DSLR camera gives you the best options, but point and shoot camera's can do a pretty good job as well. As a point-and-shoot photographer, you don’t have access to all of the luxuries you’d get with a digital SLR. The best thing to do to improve your macro photos is to get a tripod and use it because wind may blow the plants/flowers around a bit without you noticing it and when you are holding the camera you can increase the camera shake. With a tripod you will at least remove the camera shake. You can also get very close to the subject which allows you to get a perspective that's hard to get with holding the camera in your hands. Refocus between every photo to make sure the right subject is in focus. Good luck.


With DSLR cameras the macro operation is somewhat different. Select macro and you activate a different chain of events: with any lens fixed to the camera, engaging macro mode on the camera commands the lens aperture to close to its minimum, so extending the depth of field and allowing you to move closer to the subject. I usually set my camera to A (aperture) and set is for the smallest number, in my case that is f/2.8. I move back a little from the subject and then zoom in my lens. I try to use a tripod most of the time, but now and then I also just hold the camera in my hands...depending how easy the subject can be photographed. I find that it really works this way and by moving away a bit from subject and zooming in you really create a blurry background. That's usually the way I go about taking macro shots, I am sure there are better ways and of course a proper macro lens would help too, but I don't take enough macro shots to invest in that. And macro shots are not my main interest either, but the occasional macro shot is fine! :)
The pro approach would be to use a purpose-built macro lens on a DSLR. Dedicated macro lenses are not cheap but they are optimised to operate at closer than normal distances. With macro lenses you are unlikely to experience problems such as colour fringing and optical distortion; many macro lenses also compensate for the additional exposure necessary when racking out the lens to distances very different to those used in normal photography.
In the end you have to choose how much you like macro photography and if you want to go as far as taking those amazing macro shots of insects which I have not tried to do yet. I am sure you need a good macro lens for that. Well, I hope I helped some of you on the way again with a few tips.

Camera Settings:
*Camera: Sony SLT-A57
*Lens: Sony 75-300mm f/4.5-5.6
*Focal Lenght: 250mm

Camera Settings:


This time I would like to post about macro photography or close ups. This is more for those of you who don't have specific macro lens like myself, but try it by using the settings of the camera. If you are serious about macro photography then it is of course advisable to buy a proper macro lens as this will give you the best results. I enjoy some macro photography occasionally and it's more to be able to take some nice close ups of flowers/plants in the spring/summer time. So, this part will be for those of you who like to be able to take some nice macro shots while out and about in gardens, parks and such.
The best macro photography, regardless of the camera, requires that you use the smallest lens aperture to gain optimum image sharpness and depth of field. A DSLR camera gives you the best options, but point and shoot camera's can do a pretty good job as well. As a point-and-shoot photographer, you don’t have access to all of the luxuries you’d get with a digital SLR. The best thing to do to improve your macro photos is to get a tripod and use it because wind may blow the plants/flowers around a bit without you noticing it and when you are holding the camera you can increase the camera shake. With a tripod you will at least remove the camera shake. You can also get very close to the subject which allows you to get a perspective that's hard to get with holding the camera in your hands. Refocus between every photo to make sure the right subject is in focus. Good luck.
Here are some of my close ups that I took with my old point & shoot camera.
With DSLR cameras the macro operation is somewhat different. Select macro and you activate a different chain of events: with any lens fixed to the camera, engaging macro mode on the camera commands the lens aperture to close to its minimum, so extending the depth of field and allowing you to move closer to the subject. I usually set my camera to A (aperture) and set is for the smallest number, in my case that is f/2.8. I move back a little from the subject and then zoom in my lens. I try to use a tripod most of the time, but now and then I also just hold the camera in my hands...depending how easy the subject can be photographed. I find that it really works this way and by moving away a bit from subject and zooming in you really create a blurry background. That's usually the way I go about taking macro shots, I am sure there are better ways and of course a proper macro lens would help too, but I don't take enough macro shots to invest in that. And macro shots are not my main interest either, but the occasional macro shot is fine! :)
The pro approach would be to use a purpose-built macro lens on a DSLR. Dedicated macro lenses are not cheap but they are optimised to operate at closer than normal distances. With macro lenses you are unlikely to experience problems such as colour fringing and optical distortion; many macro lenses also compensate for the additional exposure necessary when racking out the lens to distances very different to those used in normal photography.
In the end you have to choose how much you like macro photography and if you want to go as far as taking those amazing macro shots of insects which I have not tried to do yet. I am sure you need a good macro lens for that. Well, I hope I helped some of you on the way again with a few tips.
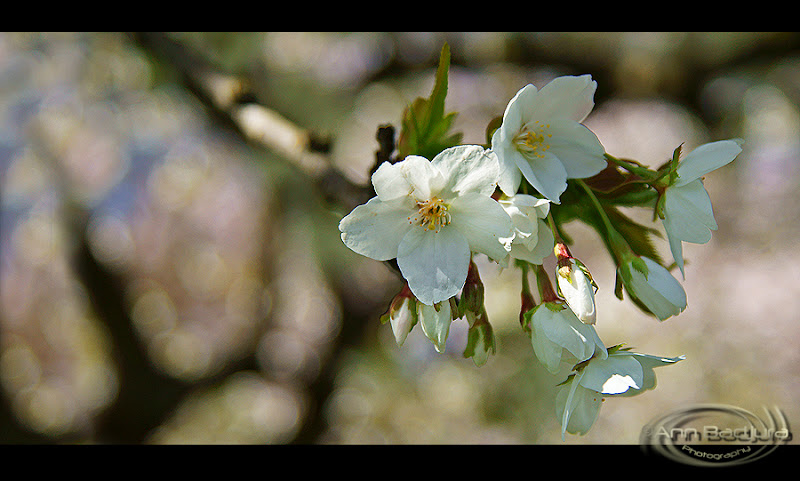
Here are some of my better macro shots
Camera Settings:
*Camera: Sony SLT-A57
*Lens: Sony 75-300mm f/4.5-5.6
*Focal Lenght: 250mm
*F-Number: F/5.6
*Exposure Time: 1/400
*ISO Speed: ISO-1250
*Exposure Program: Aperture Priority (A)
*Exposure Compensation (E/V): -0.3 step
*Exposure Time: 1/400
*ISO Speed: ISO-1250
*Exposure Program: Aperture Priority (A)
*Exposure Compensation (E/V): -0.3 step
-->Tripod was used - Taken in RAW - converted to Jpeg and some post processing work done in Photoshop (little more contrast & saturation)
Camera Settings:
*Camera: Sony SLT-A57
*Lens: Tamron SP AF17-50mm F/2.8 XR Di II
*Focal Lenght: 50mm
*Camera: Sony SLT-A57
*Lens: Tamron SP AF17-50mm F/2.8 XR Di II
*Focal Lenght: 50mm
*F-Number: F/4.5
*Exposure Time: 1/2000
*ISO Speed: ISO-100
*Exposure Program: Aperture Priority (A)
*Exposure Compensation (E/V): -0.3 step
*Exposure Time: 1/2000
*ISO Speed: ISO-100
*Exposure Program: Aperture Priority (A)
*Exposure Compensation (E/V): -0.3 step
-->Tripod was used - Taken in RAW - converted to Jpeg and some post processing work done in Photoshop (little more contrast & saturation)
*Camera: Sony SLT-A57
*Lens: Tamron SP AF17-50mm F/2.8 XR Di II
*Focal Lenght: 35mm
*F-Number: F/2.8
*Exposure Time: 1/500
*ISO Speed: ISO-100
*Exposure Program: Aperture Priority (A)
*Exposure Compensation (E/V): -0.3 step
*Exposure Time: 1/500
*ISO Speed: ISO-100
*Exposure Program: Aperture Priority (A)
*Exposure Compensation (E/V): -0.3 step
-->Tripod was used - Taken in RAW - converted to Jpeg and some post processing work done in Photoshop (little more contrast & saturation)
Camera Settings:
*Camera: Sony SLT-A57
*Lens: Tamron SP AF17-50mm F/2.8 XR Di II
*Focal Lenght: 50mm
*F-Number: F/2.8
*Exposure Time: 1/160
*ISO Speed: ISO-100
*Exposure Program: Aperture Priority (A)
*Exposure Compensation (E/V): -0.3 step
*Exposure Time: 1/160
*ISO Speed: ISO-100
*Exposure Program: Aperture Priority (A)
*Exposure Compensation (E/V): -0.3 step
-->Tripod was used - Taken in RAW - converted to Jpeg and some post processing work done in Photoshop (little more contrast & saturation)
Camera Settings:
*Camera: Sony SLT-A57
*Lens: Tamron SP AF17-50mm F/2.8 XR Di II
*Focal Lenght: 40mm
*F-Number: F/2.8
*Exposure Time: 1/250
*ISO Speed: ISO-100
*Exposure Program: Aperture Priority (A)
*Exposure Compensation (E/V): -0.3 step
*Exposure Time: 1/250
*ISO Speed: ISO-100
*Exposure Program: Aperture Priority (A)
*Exposure Compensation (E/V): -0.3 step
-->Tripod was used - Taken in RAW - converted to Jpeg and some post processing work done in Photoshop (little more contrast & saturation)
Images Copyright by Ann Badjura unless otherwise mentioned.
Contact me by email if you are interesting in buying or using any of my images. THANK YOU!
No comments:
Post a Comment